How to host a CTF event | VULNCON 2020 CTF | International CTF Infrastructure Management
Host CTF for Free


Top Teams

In this blog, I will be talking about how we hosted our International CTF (VULNCON 2020 CTF) for free, the issues we faced and certain tips and tricks that we used to make the user experience smooth. This will provide you with most of the resources and information required to host your own CTF for free. This is an insight of how I managed CTF infrastructure.
What is a CTF?
A CTF is a hacking competition. The participants compete for the highest score, by hacking intentionally vulnerable apps. It’s a great deal of fun competing, but how does one host a CTF? This is the story of how I’ve been doing it.
Creating the CTF Event
Having previously created CTF events, I consider myself to be adept at what it takes to host an effective event. CTF contests can help train participants by teaching them to think like a bad actor. The premise is that people retain the most knowledge by doing rather than listening. As a result, when competitors approach challenges with malicious intent, they are much more aware of what they need to consider in their own applications.
Section
- Stats
- Platform Infrastructure
- CTFd Setup
- Issues We faced
- Detailed insights of server Status
- User Feedback of CTF
- Conclusion
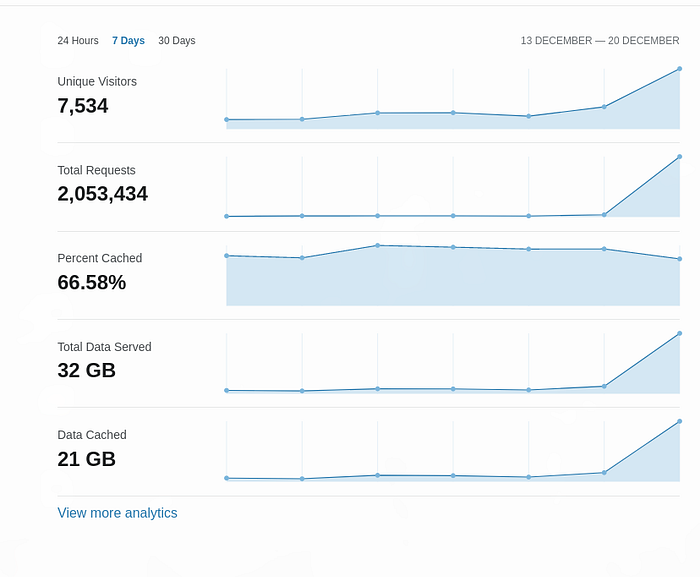
Stats


Statistics by Cloudflare


Platform Infrastructure
We have mainly used Google Cloud Services, there is no special reason for this choice but I was more familiar with GCP and every member in our team had free 300$ credits in google cloud(xD). But to be in safe side, we took sponsorship from google cloud.
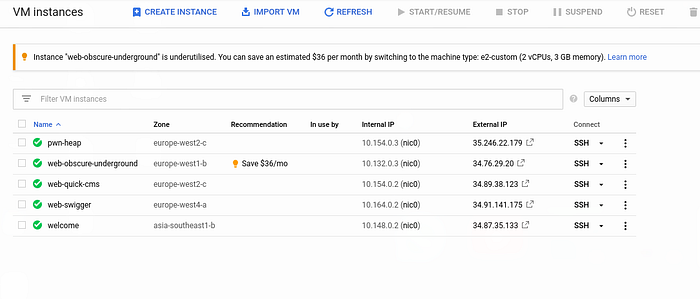
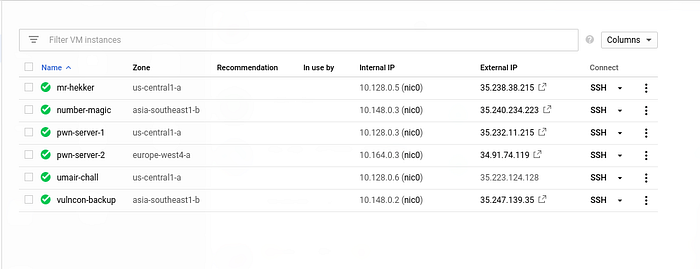
We ran a total of 12 servers, One for the CTFd, one for Backup Server of CTFd(in case of any downtime) and rest is to host pwn and web challenges.
Details
- Ubuntu Server 18.04 LTS with 12 cores and 16 GB RAM for CTFd instance.(Location: Singapore, Asia)
- Ubuntu Server 18.04 LTS with 2 cores and 8 GB RAM for back-up of CTFd in case of any down time.( Glad to say that there was no downtime of the CTFd during the CTF)
- 3*Ubuntu Server 20.04 LTS with 2 core and 2GB RAM for easy PWN challenges (Region: Europe)
- 2 *Ubuntu Server 20.04 LTS with 4 cores and 2GB RAM for PWN challenges which requires high CPU and includes Bruteforcing.(Region: Europe)
- 6*Ubuntu Server 20.04 LTS with 2 cores and 2GB RAM for web challenges. (We created seperate instance for web challenges) (Region: Asia)
Probably, we have over consumed the resources as we have a lot of free credits.
Platform we used
In VULNCON 2020, we have used most popular CTF framework known as CTFd. It is an open-source platform used by many CTF events. CTFd is available as a container based application on Github. It’s easy to use, and has a featureful admin panel that shows useful statistics during the CTF, and also allows you to perform common user/team management tasks.
CTFd Setup on your Server
There are three way to deploy CTFd to host any CTF
- Pay to the developers of CTFd and they will manage all the infrastructure related stuffs.
- You can clone the repo of CTFd and install all the dependencies manually using pip. After that configure the MySQL and Redis Database manually which is tendious task to do.
- You can use the docker-compose.yml file present on the CTFd repo to conveniently deploy each component on your server in separate containers.
I personally recommend you to use option 3 as it is easier to setup and migrate to another server.
Some extra tips to configure CTFd:
- Rate limiting requests on the server, to mitigate flag brute-force or DDOS attacks.
- A firewall to only allow connections on some ports.
- Logging requests correctly to trace back illegitimate activity( Very usefull to track user activity)
So let’s start with the setup part
First of all you need to install docker and docker-compose to begin with the setup. The instructions to install these are documented well in CTFd documentation itself.
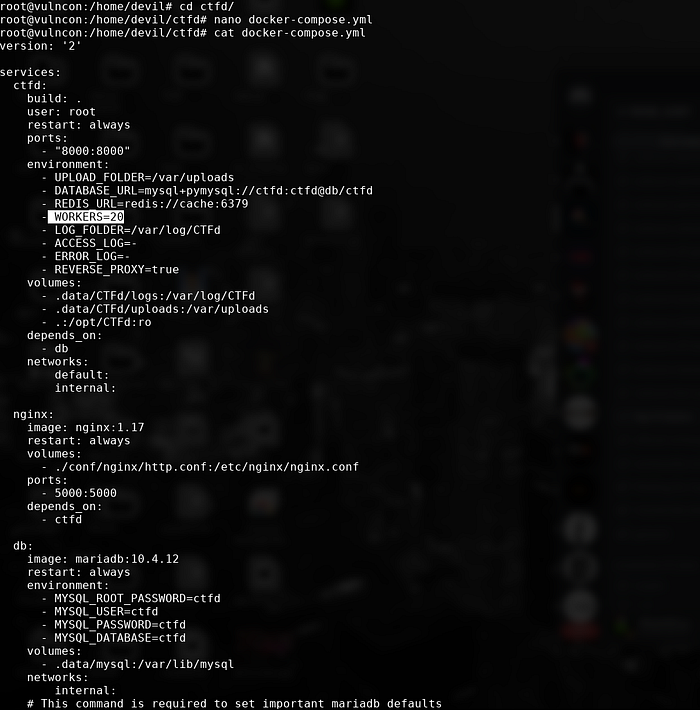
Now, clone the repository of CTFd in your server to start with the configuration and edit the docker-compose.yml file to update the number of gunicorn workers. This defines how many instances of CTFd will be running. In our CTF, we have used 20 workers which is enough for 1500 users. In general, number of workers = amount of traffic you expect.
To startup CTFd now, cd inside your CTFd repo, and run:
screen command to get another screen where we will run CTFd. The reason for this is we can see the requests in real time. After entering into another screen run another command to startup ctfd.
docker-compose up
Be patient, this will take a while the first time, but it should eventually startup CTFd running on port 8000 on your server but it will be not accessible if you enter your public ip of instance along with port number as by default only port 22,80 and 443 is open in GCP firewall. But don’t worry, we’ll setup nginx reverse proxy to route our request to port 8000 from port 80. I’ll explain the reason for this while setting of nginx.
You can detach from this screen and everything will be setup. Press ctrl +A and D respectively. To enter into the screen and see whatever is going on background, enter screen -r to reattach to the previous screen. Isn’t it simple?
Setting up rate limit, Nginx and Firewall
Nginx is a reverse proxy server, i.e, its job is to accept incoming connections to your server, and route them to another server running on a machine. We will be setting up Nginx and configuring it to do the following things:
- We’ll set up rate limiting to limit both the no of requests per second to CTFd and also the maximum no of simultaneous connections from a single host to prevent DDOS or bruteforce.
- If you’re using Cloudflare, we’ll also reconfigure Nginx to correctly log the original user’s IP address, instead of logging only Cloudflare IPs in Nginx logs.
First, we need to install a firewall service ufw and nginx on our server.
sudo apt update
sudo apt install nginx ufw
Now, allow ssh, HTTP, and HTTPS through the firewall:
sudo ufw allow 'Nginx Full'
sudo ufw allow 'OpenSSH'
And finally, enable the firewall :)
sudo ufw enable
At this point, visiting your domain or IP should show the default Nginx page, let’s reconfigure it to show CTFd instead.
Create a file at /etc/nginx/sites-available/mydomain.com (replace mydomain.com with your domain) with the following contents. This sets up rate-limiting at 10 requests per second, and a max of 10 simultaneous connections per IP address at a time, and also tells Nginx to route requests to mydomain.com at port 8000.
limit_req_zone  $http_cf_connecting_ip zone=mylimit:10m rate=10r/s;
limit_conn_zone $http_cf_connecting_ip zone=addr:10m;
server {
        server_name mydomain.com;
        limit_req zone=mylimit burst=15;
        limit_conn addr 10;
        limit_req_status 429;
        client_max_body_size 8M;
        location / {
                     proxy_pass http://localhost:8000;
        proxy_http_version 1.1;
        proxy_set_header Upgrade $http_upgrade;
        proxy_set_header Connection 'upgrade';
        proxy_set_header Host $host;
        proxy_cache_bypass $http_upgrade;
 }
}
Create a symlink to the file you created in the previous step in /etc/nginx/sites-enabled and reload Nginx, and we’re done!
sudo ln -s /etc/nginx/sites-available/mydomain.com /etc/nginx/sites-enabled/mydomain.com
sudo nginx -s reload
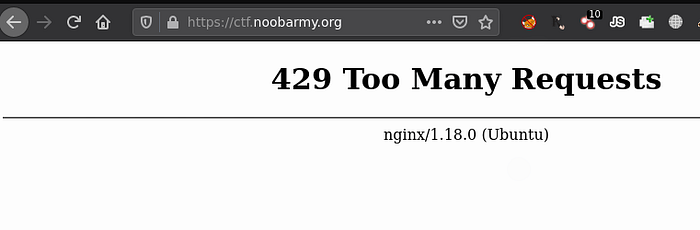
Try visiting mydomain.com in a browser, it should now show the CTFd page, and also rate limit your requests!
With this configuration, CTFd will logs the real IP address of the users not the IP of cloudflare. You can see in this picture. These are the IP’s of 2nd rank Team

Rate Limit Reference: https://medium.com/csictf/self-hosting-a-ctf-platform-ctfd-90f3f1611587
Cloudflare
I used Cloud Flare as our DNS manager, CDN and for DDOS protection. More over its free!
It also helped us by providing free SSL certificate and also caching some parts of the website. Half of the requests were cached!
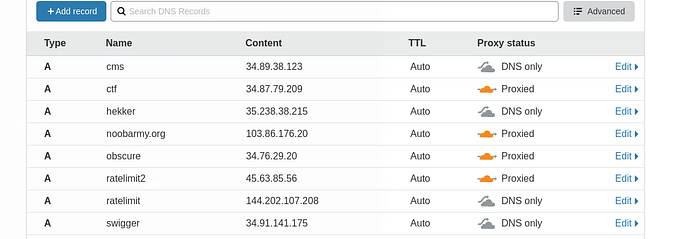
Just point A records to the servers and don’t forget to proxy the CTFd server.
Note: In our case, we didn’t applied proxy to all subdomains because some challenges require malicious payloads to be sent like in SQL injection and cloudflare blocks those request which will make challenges to unsolvable.
Mail Server
Now everything is set up. So it’s time to add Email verification for users to prevent from spams. I was too lazy to configure mail server so I used mailgun as it is very easy to setup. Just add the records as they say and add the API key to CTFd. Done!
Note: First 6000 mails are free in Mailgun! So we don’t need to pay for anything.
You should now have a stable platform set up for users to register, login and view challenges/submit flags on your CTF.
But this article was just the tip of the iceberg in what goes into setting up efficient, fast, and more importantly a stable CTF.
Issues we faced
All the quotas available in GCP were exhausted
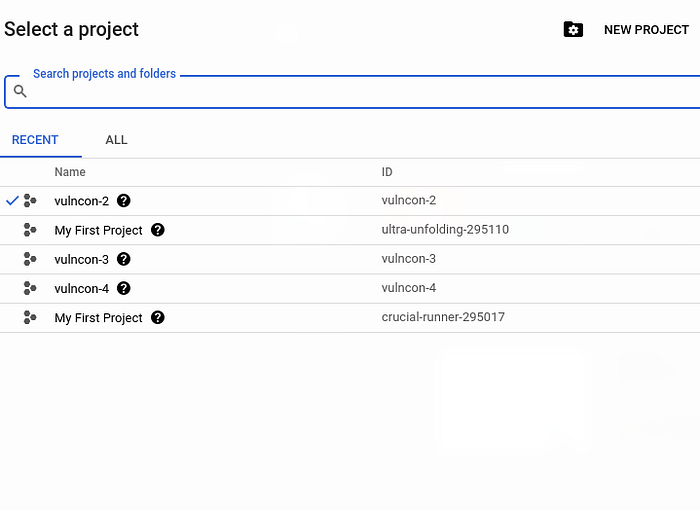
Since we have started the registration one month ago, so I kept our main instance of CTFd running with 2 cores only. But just a day before of CTF starts, I tries to increase the cores to 12 but unfortunately I got an error saying “You’ve exceed maximum CPU limit.” At this point of time, we cannot ask google to increase our quotas as it takes a week for them to verify all the stuffs. After discussing this issue with Anas Jamal a.k.a White_Wolf, he give a quick solution is to create another project. In new project, all the CPU limit set to default and again we got 12 cores. This was a quick fix :)
Site was a bit slow at the starting
When the CTF starts i.e at 4 PM IST, we noticed a heavy load on our platform which makes the CTF a bit slow and gives 500 error which last only for 2–3 seconds. At the starting, I kept the gunicorn workers to12 but after 5 minutes of the starting of CTF, I realized that it was due to less number of workers. So I increased it to 20 and now everything works smooth.
Some Detailed Insights of Server Status
CPU Usage Pattern of main CTFd Instance
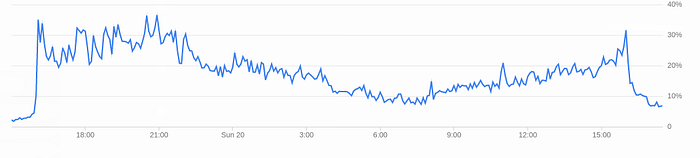
In the above picture, we can see the graph goes straight up when the CTF starts at 4 PM. The highest CPU usage recorded is 43% which is at 4 PM. The CPU usage remains in between 40% — 30% during the 1st 6 hours of the CTF and decreases to 10 % at the morning time i.e 6 AM IST.
CPU usage of SQL based web challenge
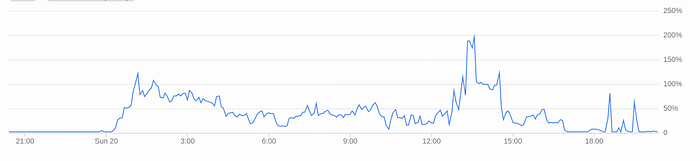
This instance faced highest CPU usage as many users run automated scanners like SQL map. It becomes a bit slow at the mid but after the announcement made on discord that this challenge doesn’t requires automates tools, the cpu usage reduced to normal.
Insights of PWN challenges server

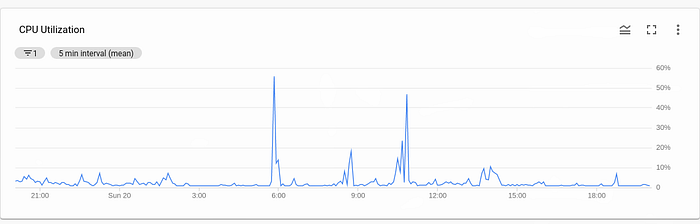
In second picture, the CPU reached to 60% as it requires bruteforcing to solve the challenge. This challenged is solved by very few teams so the usage of CPU is very low.
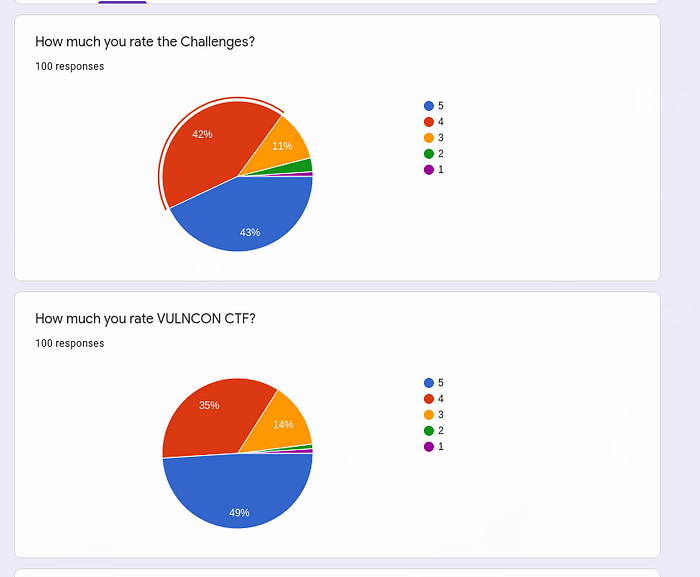
Feedback
We have received very positive feedback from Teams.

Conclusion
So this was an insight on how we used our resources to host a CTF on an international scale for free. I hope this arcticle will help you to choose correct resources and scalability for your CTF. We liked the response we got on this year’s CTF and we hope we will get noticed by more teams for the next year’s CTF.
Even though we faced some issues, the event was a great success :)
I’m so happy this edition was concluded successfully and we got great feedbacks, I have definitely learned a lot from this opportunity, can’t wait for the next edition ; it will be more exciting !!!
This article cannot be ended without giving Special Thanks to Anas Jamal a.k.a White_Wolf who helped me a lot in hosting PWN challenges.
Thanks for taking out time and giving it a read some claps would be really appreciated!
For any questions you can contact me on twitter, instagram or discord!
Twitter @hackw1thproxy
Instagram @hackwithproxy
Discord r3curs1v3_pr0xy#3989
Have a Great Day :)